


A timeline,Copy the CSS and paste it into your theme settings under "Insert Code" -> "Custom CSS." Then, create a new post and add the code into it.Sourced from "Guangran Notes" (广然笔记) and "Youxiang Cloud" (优享云). The code below is the original version from "Guangran Notes"—simply create a new post to use it.
div.timenode {
    position:relative;
}
div.timenode:before,div.timenode:after {
    content:'';
    z-index:1;
    position:absolute;
    background:rgba(57,186,232,0.5);
    width:2px;
    left:7px;
}
div.timenode:before {
    top:0px;
    height:6px;
}
div.timenode:after {
    top:26px;
    height:calc(100% - 26px);
}
div.timenode:last-child:after {
    height:calc(100% - 26px - 16px);
    border-bottom-left-radius:2px;
    border-bottom-right-radius:2px;
}
div.timenode .meta,div.timenode .body {
    max-width:calc(100% - 24px);
}
div.timenode .meta {
    position:relative;
    color:#5e5e5e;
    font-size:0.875rem;
    line-height:32px;
    height:32px;
}
div.timenode .meta:before,div.timenode .meta:after {
    content:'';
    position:absolute;
    top:8px;
    z-index:2;
}
div.timenode .meta:before {
    background:rgba(36,136,136);
    width:16px;
    height:16px;
    border-radius:8px;
    -webkit-border-radius:8px;
}
div.timenode .meta:after {
    background:#00d084;
    width:16px;
    height:16px;
    border-radius:8px;
    -webkit-border-radius:8px;
    transform:scale(0.5);
    -webkit-transform:scale(0.5);
    -khtml-transform:scale(0.5);
    -moz-transform:scale(0.5);
    -o-transform:scale(0.5);
    -ms-transform:scale(0.5);
    transition:all 0.28s ease;
    -webkit-transition:all 0.28s ease;
    -khtml-transition:all 0.28s ease;
    -moz-transition:all 0.28s ease;
    -o-transition:all 0.28s ease;
    -ms-transition:all 0.28s ease;
}
div.timenode .meta p {
    font-weight:bold;
    margin:0 0 0 24px;
}
div.timenode .body {
    margin:4px 0 16px 24px;
    padding:16px;
    border-radius:8px;
    -webkit-border-radius:8px;
    background:#f0f0f0;
    display:-webkit-box;
    display:-moz-box;
    display:inline-block;
}
div.timenode .body:empty {
    display:-webkit-box;
    display:-moz-box;
    display:none;
}
div.timenode .body >*:first-child {
    margin-top:0.25em;
}
div.timenode .body >*:last-child {
    margin-bottom:0.25em;
}
div.timenode .body .highlight {
    border:1px solid #e5e5e5;
}
div.timenode:hover .meta {
    color:#181818;
}
div.timenode:hover .meta:before {
    background:#0693e3;
}
div.timenode:hover .meta:after {
    background:#00d084;
    transform:scale(1);
    -webkit-transform:scale(1);
    -khtml-transform:scale(1);
    -moz-transform:scale(1);
    -o-transform:scale(1);
    -ms-transform:scale(1);
}
A modified version by "Youxiang Cloud."
A timeline helps you document your website's history and significant milestones. This tutorial is applicable to most WordPress sites and includes a feature for publishing timeline entries directly from the WordPress admin dashboard.

Tutorial Steps
This tutorial consists of two main steps:
- Registering a custom post type
- Adding a custom template
Registering a custom post type
First, access your theme files. functions.phpAdd the code below to register the "Timeline" custom post type:
//时间轴代码
add_action('init', 'my_time_axis');

function my_time_axis() {
    $labels = array(
        'name'               => '时间轴',
        'singular_name'      => '时间轴',
        'add_new'            => '发表时间轴',
        'add_new_item'       => '发表时间轴',
        'edit_item'          => '编辑时间轴',
        'new_item'           => '新时间轴',
        'view_item'          => '查看时间轴',
        'search_items'       => '搜索时间轴',
        'not_found'          => '暂无时间轴',
        'not_found_in_trash' => '没有已遗弃的时间轴',
        'parent_item_colon'  => '',
        'menu_name'          => '时间轴'
    );

    $args = array(
        'labels'             => $labels,
        'public'             => true,
        'publicly_queryable' => true,
        'show_ui'            => true,
        'show_in_menu'       => true,
        'query_var'          => true,
        'rewrite'            => true,
        'capability_type'    => 'post',
        'has_archive'        => true,
        'hierarchical'       => false,
        'menu_position'      => null,
        'supports'           => array('title', 'editor', 'author')
    );

    register_post_type('timeline', $args);
}
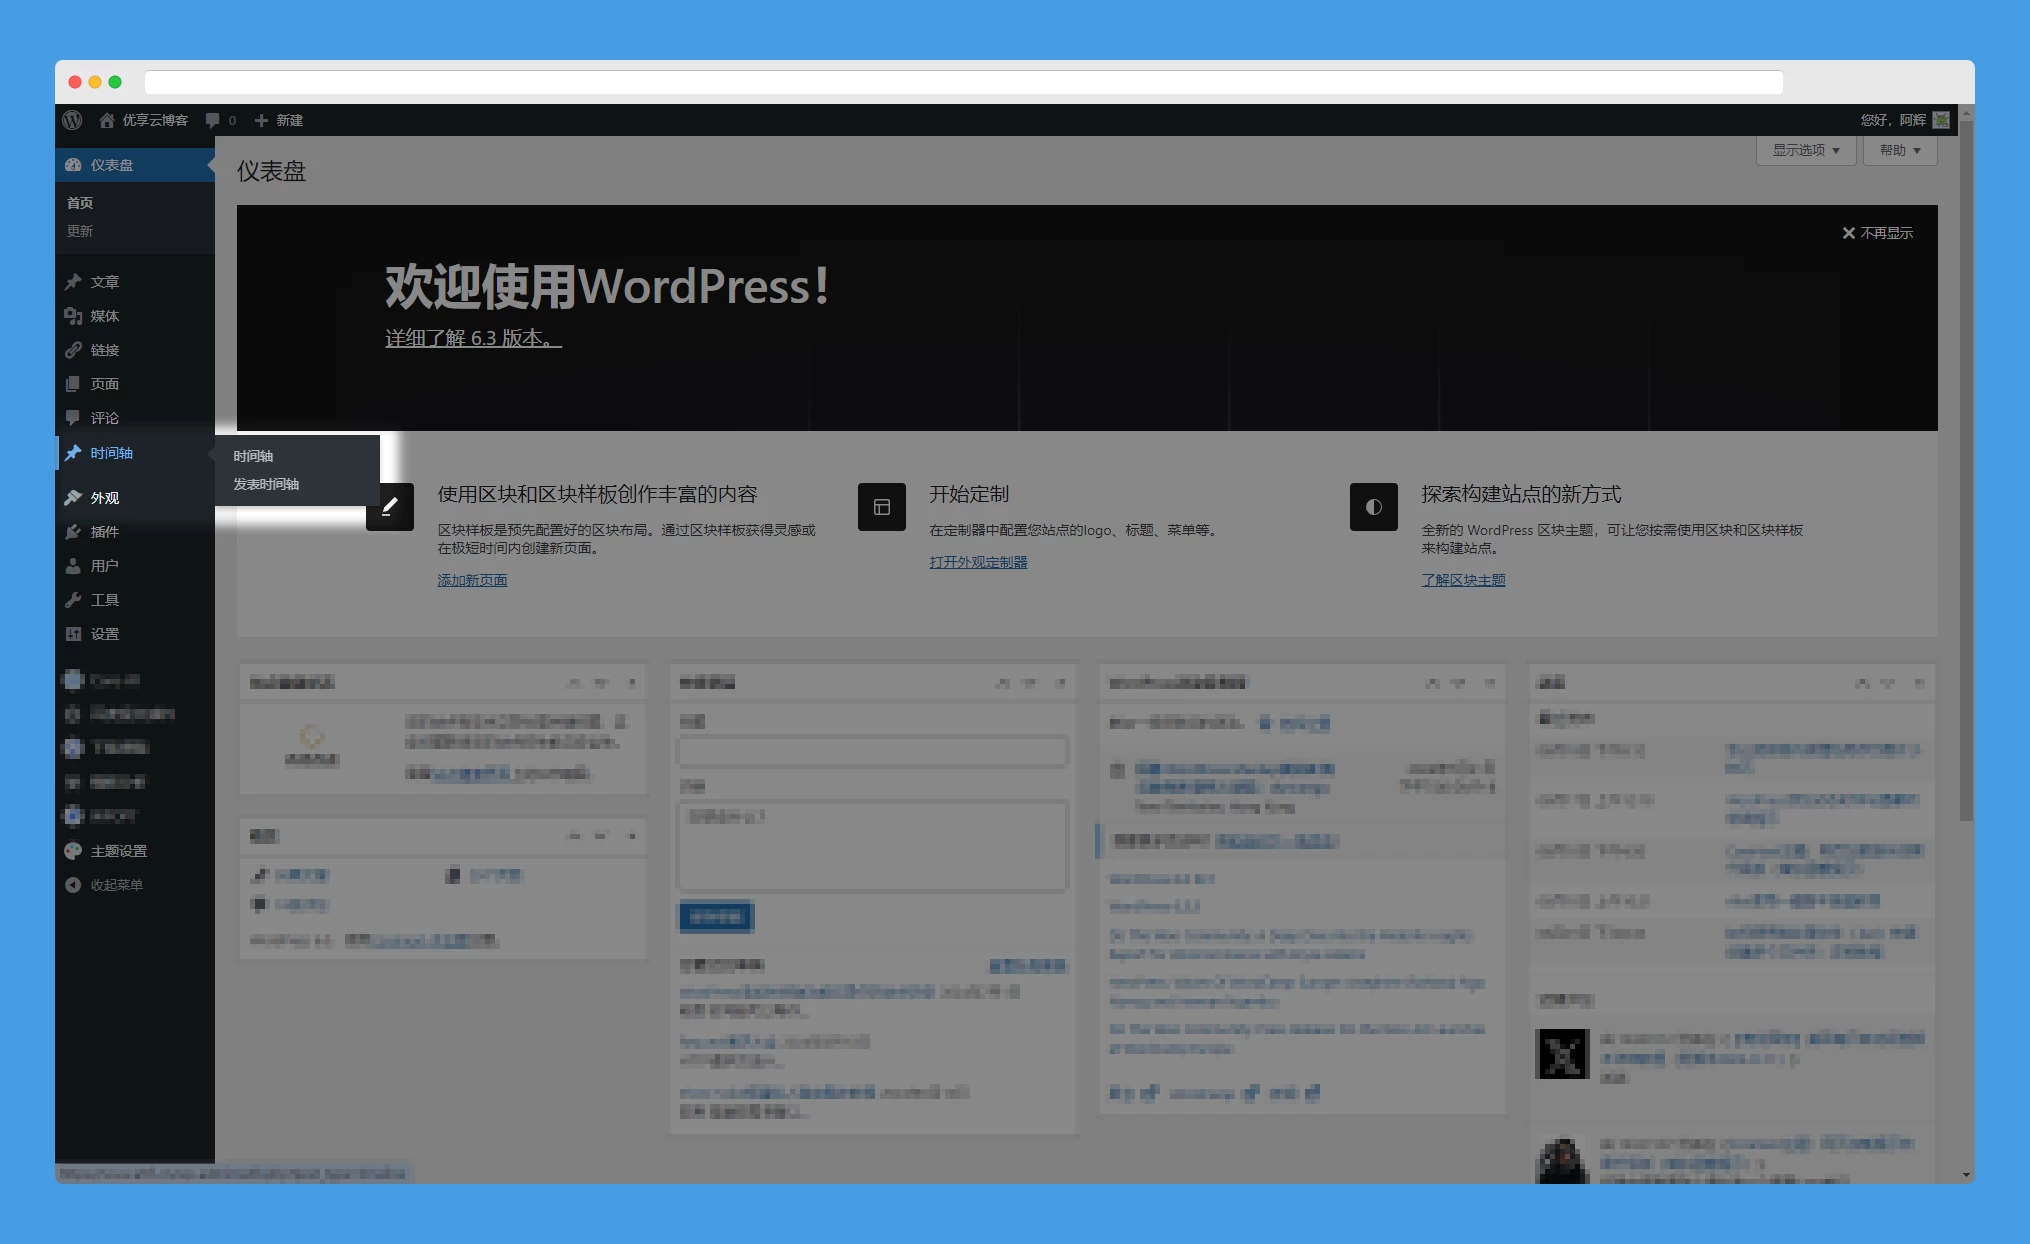
Once the code above has been added, you will see a "Timeline" menu in your WordPress admin sidebar, which you can use to publish and manage your timeline posts.
Create a template file
Create a template file—or add the code to an existing template—to display "timeline" posts, sorted chronologically. Create a template file within your theme timeline.phpAlternatively, you can add the following code to an existing template file:
<?php
// 获取“时间轴”文章
$args = array(
    'post_type'      => 'timeline',
    'posts_per_page' => -1,
    'orderby'        => 'date',
    'order'          => 'DESC',
);

$timeline_query = new \WP_Query($args);

<?php if ($timeline_query->have_posts()) : ?>
    <div class="timeline">
    <?php while ($timeline_query->have_posts()) : $timeline_query->the_post(); ?>
            <div class="timenode">
        <div class="meta">
          <p></p>
          <p><?php the_title(); ?></p>
          <p></p>
        </div>
            <div class="body">
        <p><?php the_content(); ?></p>
      </div>
      </div>
        <?php endwhile; ?>
  </div>
<?php endif; wp_reset_postdata(); ?>

<style>
div.timenode{position:relative;}div.timenode:before,div.timenode:after{content:'';z-index:1;position:absolute;background:rgba(57,186,232,0.5);width:2px;left:7px;}div.timenode:before{top:0px;height:6px;}div.timenode:after{top:26px;height:calc(100% - 26px);}div.timenode:last-child:after{height:calc(100% - 26px - 16px);border-bottom-left-radius:2px;border-bottom-right-radius:2px;}div.timenode .meta,div.timenode .body{max-width:calc(100% - 24px);}div.timenode .meta{position:relative;color:#5e5e5e;font-size:0.875rem;line-height:32px;height:32px;}div.timenode .meta:before,div.timenode .meta:after{content:'';position:absolute;top:8px;z-index:2;}div.timenode .meta:before{background:rgba(36,136,136);width:16px;height:16px;border-radius:8px;-webkit-border-radius:8px;}div.timenode .meta:after{background:#00d084;width:16px;height:16px;border-radius:8px;-webkit-border-radius:8px;transform:scale(0.5);-webkit-transform:scale(0.5);-khtml-transform:scale(0.5);-moz-transform:scale(0.5);-o-transform:scale(0.5);-ms-transform:scale(0.5);transition:all 0.28s ease;-webkit-transition:all 0.28s ease;-khtml-transition:all 0.28s ease;-moz-transition:all 0.28s ease;-o-transition:all 0.28s ease;-ms-transition:all 0.28s ease;}div.timenode .meta p{font-weight:bold;margin:0 0 0 24px;}div.timenode .body{margin:4px 0 16px 24px;padding:16px;border-radius:8px;-webkit-border-radius:8px;background:#f0f0f0;display:-webkit-box;display:-moz-box;display:inline-block;}div.timenode .body:empty{display:-webkit-box;display:-moz-box;display:none;}div.timenode .body >*:first-child{margin-top:0.25em;}div.timenode .body >*:last-child{margin-bottom:0.25em;}div.timenode .body .highlight{border:1px solid #e5e5e5;}div.timenode:hover .meta{color:#181818;}div.timenode:hover .meta:before{background:#0693e3;}div.timenode:hover .meta:after{background:#00d084;transform:scale(1);-webkit-transform:scale(1);-khtml-transform:scale(1);-moz-transform:scale(1);-o-transform:scale(1);-ms-transform:scale(1);}
</style>
The CSS above has been compressed for brevity; you can reformat it if you need to make changes.
Theme example: CoreNext
Using the CoreNext theme as an example: if you are using a child theme, go to... CoreNext-Child/template/ Create a new file timeline.phpPaste the following code into them.
<?php
/*
Template Name: 时间轴
*/
namespace core_next;
the_post();

// 获取“时间轴”文章
$args = array(
    'post_type'      => 'timeline',
    'posts_per_page' => -1,
    'orderby'        => 'date',
    'order'          => 'DESC',
);

$timeline_query = new \WP_Query($args);

?>
<!doctype html>
<html lang="zh">
<?php get_template_part('template/views/header'); ?>
<body>
<div id="core-next-app">
    <app-header ref="app_header" id="app-header"></app-header>
    <main class="container">
        <div class="main-warp">
            <div class="post-warp">
                <div class="title-warp">
                    <h1 class="post-title"><?php the_title() ?></h1>
                </div>
                <div class="page-info-warp">
                    <?php
                    if (WordPress::isAdmin()) {
                        $post_id = get_the_ID();
                        $edit_post_link = get_edit_post_link($post_id);
                        echo '<div><i class="czs-pen-write"></i> <a href="' . $edit_post_link . '">编辑</a></div>';
                    }
                    ?>
                </div>
                <div class="content-warp">
                    <!--页面文章-->
                    <?php the_content(); ?>

                    <!--时间轴代码-->
                    <?php if ($timeline_query->have_posts()) : ?>
                        <div class="timeline">
                            <?php while ($timeline_query->have_posts()) : $timeline_query->the_post(); ?>
                                <div class="timenode">
                                    <div class="meta">
                                        <p></p>
                                        <p><?php the_title(); ?></p>
                                        <p></p>
                                    </div>
                                    <div class="body">
                                        <p><?php the_content(); ?></p>
                                    </div>
                                </div>
                            <?php endwhile; ?>
                        </div>
                    <?php endif; wp_reset_postdata(); ?>

                    <style>
                        div.timenode{position:relative;}div.timenode:before,div.timenode:after{content:'';z-index:1;position:absolute;background:rgba(57,186,232,0.5);width:2px;left:7px;}div.timenode:before{top:0px;height:6px;}div.timenode:after{top:26px;height:calc(100% - 26px);}div.timenode:last-child:after{height:calc(100% - 26px - 16px);border-bottom-left-radius:2px;border-bottom-right-radius:2px;}div.timenode .meta,div.timenode .body{max-width:calc(100% - 24px);}div.timenode .meta{position:relative;color:#5e5e5e;font-size:0.875rem;line-height:32px;height:32px;}div.timenode .meta:before,div.timenode .meta:after{content:'';position:absolute;top:8px;z-index:2;}div.timenode .meta:before{background:rgba(36,136,136);width:16px;height:16px;border-radius:8px;-webkit-border-radius:8px;}div.timenode .meta:after{background:#00d084;width:16px;height:16px;border-radius:8px;-webkit-border-radius:8px;transform:scale(0.5);-webkit-transform:scale(0.5);-khtml-transform:scale(0.5);-moz-transform:scale(0.5);-o-transform:scale(0.5);-ms-transform:scale(0.5);transition:all 0.28s ease;-webkit-transition:all 0.28s ease;-khtml-transition:all 0.28s ease;-moz-transition:all 0.28s ease;-o-transition:all 0.28s ease;-ms-transition:all 0.28s ease;}div.timenode .meta p{font-weight:bold;margin:0 0 0 24px;}div.timenode .body{margin:4px 0 16px 24px;padding:16px;border-radius:8px;-webkit-border-radius:8px;background:#f0f0f0;display:-webkit-box;display:-moz-box;display:inline-block;}div.timenode .body:empty{display:-webkit-box;display:-moz-box;display:none;}div.timenode .body >*:first-child{margin-top:0.25em;}div.timenode .body >*:last-child{margin-bottom:0.25em;}div.timenode .body .highlight{border:1px solid #e5e5e5;}div.timenode:hover .meta{color:#181818;}div.timenode:hover .meta:before{background:#0693e3;}div.timenode:hover .meta:after{background:#00d084;transform:scale(1);-webkit-transform:scale(1);-khtml-transform:scale(1);-moz-transform:scale(1);-o-transform:scale(1);-ms-transform:scale(1);}
                    </style>
                    <!--时间轴代码-->
                </div>
            </div>
            <app-comment id="app-comment"></app-comment>
        </div>
    </main>
    <?php get_template_part('template/module/footer'); ?>
</div>
</body>
<?php wp_footer(); ?>
</html>
Next, go to your WordPress admin dashboard, create a new page, and select the "Timeline" template.
Conclusion
By following these steps, you have successfully created a timeline on your WordPress site. You can now publish timeline posts to record and showcase your website's history and key events.



No Comment! Be the first one.