

A project by "Ah Q". His content-scraping plugin, "QQWorld Collector" (QQWorld Collector), is excellent and powerful. It has been consistently updated for years—I’ve been using it for a long time, and it’s very stable. A standout feature is that purchasing the plugin includes unlimited custom scraping rule creation, which is truly impressive—unlike many other plugins or software solutions. Link:Ah Q’s project.

The best static caching solution for WordPress—free and highly efficient. This tutorial will show you how to enable this cache via the Baota (BT) Panel to speed up your WordPress site, making it a favorite for search engines like Baidu.
When it comes to WordPress caching, the first thing that likely comes to mind is... WP-Super-Cache static HTML caching, as well as memcached or redis Dynamic caching—while plugins can certainly provide caching, they often come with various issues, such as complex configurations, English-only interfaces, or conflicts between different plugins. Therefore, today I will show you a more advanced caching method:Nginx fastcgi_cacheIt caches pages directly at the Nginx level and even supports caching for "pseudo-static" (pretty) URLs! The performance is far superior to traditional PHP-based caching. Since many people use the Baota (BT) Panel, today’s tutorial is based on that platform.
It is now included by default in the Baota Panel. Nginx ngx_cache_purge module, so we can skip the installation steps.
Global Settings
Now, let’s configure Nginx. Go to the Baota dashboard, locate Nginx in the Software Store, click "Settings," and add the following content to the configuration file:
fastcgi_cache_path /tmp/wpcache levels=1:2 keys_zone=WORDPRESS:250m inactive=1d max_size=1G;
fastcgi_temp_path /tmp/wpcache/temp;
fastcgi_cache_key "$scheme$request_method$host$request_uri";
fastcgi_cache_use_stale error timeout invalid_header http_500;
#忽略一切 nocache 申明,避免不缓存伪静态等
fastcgi_ignore_headers Cache-Control Expires Set-Cookie;
Here is a screenshot after the setup is complete:
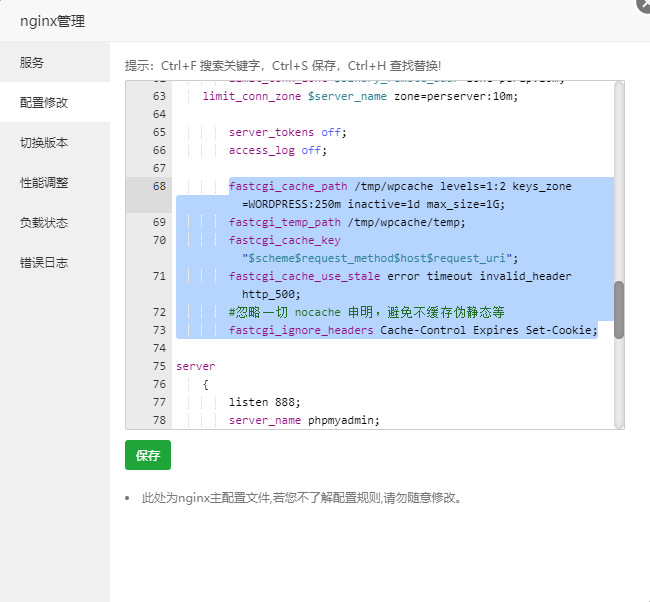
Add global cache settings.
Website settings
In the website list within the Baota (BT) panel, locate your site, click the "Settings" button, and add the following code to the configuration file:(Change the public server IP address in the third-to-last line to your own.)
set $skip_cache 0;
#post 访问不缓存
if ($request_method = POST) {
	set $skip_cache 1;
}
#动态查询不缓存
if ($query_string != "") {
	set $skip_cache 1;
}
#后台等特定页面不缓存(其他需求请自行添加即可)
if ($request_uri ~* "/wp-admin/|/xmlrpc.php|wp-.*.php|/feed/|index.php|sitemap(_index)?.xml") {
	set $skip_cache 1;
}
#对登录用户、评论过的用户不展示缓存
if ($http_cookie ~* "comment_author|wordpress_[a-f0-9]+|wp-postpass|wordpress_no_cache|wordpress_logged_in") {
	set $skip_cache 1;
}
#这里请参考你网站之前的配置,特别是sock的路径,弄错了就502了!如果你的网站使用PHP7.4,就写-74.sock
location ~ [^/]\.php(/|$)
{
    try_files $uri =404;
    fastcgi_pass unix:/tmp/php-cgi-74.sock;
    fastcgi_index index.php;
    include fastcgi.conf;
    add_header Strict-Transport-Security "max-age=63072000; includeSubdomains; preload";
    #新增的缓存规则
    fastcgi_cache_bypass $skip_cache;
    fastcgi_no_cache $skip_cache;
    add_header X-Cache "$upstream_cache_status From $host";
    fastcgi_cache WORDPRESS;
    add_header Cache-Control  max-age=0;
    add_header Nginx-Cache "$upstream_cache_status";
    add_header Last-Modified $date_gmt;
    add_header X-Frame-Options SAMEORIGIN; # 只允许本站用 frame 来嵌套
    add_header X-Content-Type-Options nosniff; # 禁止嗅探文件类型
    add_header X-XSS-Protection "1; mode=block"; # XSS 保护
    etag  on;
    fastcgi_cache_valid 200 301 302 1d;
}
#缓存清理配置
location ~ /purge(/.*) {
	allow 127.0.0.1;
	allow "服务器外网IP"; # 引号要保留
	deny all;
	fastcgi_cache_purge WORDPRESS "$scheme$request_method$host$1";
}
Here is a screenshot after the setup is complete:Make sure to add this code inside the `server` block—refer to the provided image for the correct placement—rather than just appending it to the very end of the file.
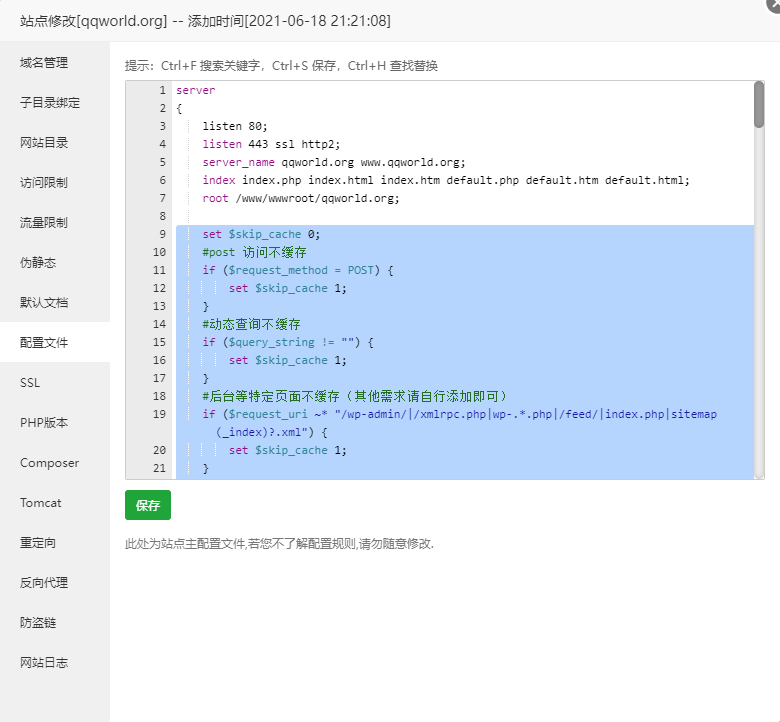
Site-specific settings
Once added, reload the Nginx configuration to activate the cache.
WordPress cache-clearing plugin
Backend search Nginx Helper Install and activate the plugin; this plugin is designed for... WordPress `fastcgi_cache` caching A highly useful plugin. Once installed, open it...Nginx Helper As for the plugin settings, the defaults are generally fine. I personally enabled "preloading" because my site consists mostly of articles and doesn't require much user interaction. If you run an e-commerce site that allows guest checkout (purchasing without logging in), I wouldn't recommend this; however, if users must log in to make a purchase, it shouldn't cause any issues.
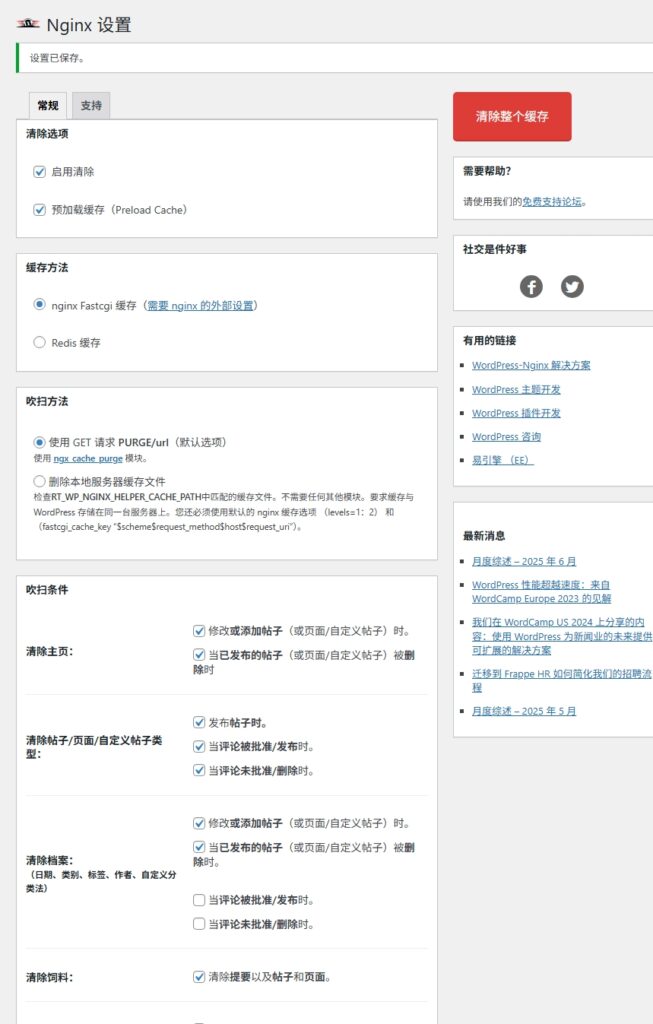
Checking the cache status
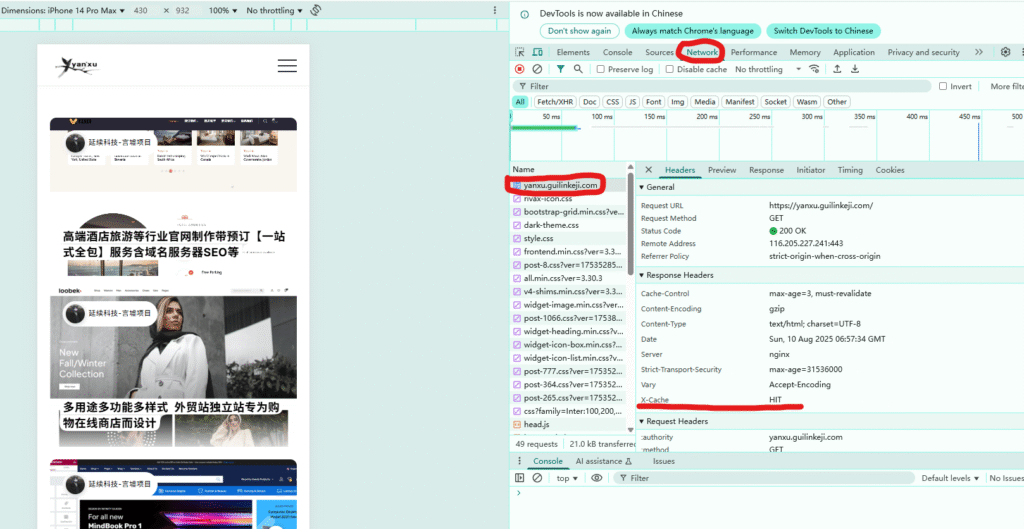
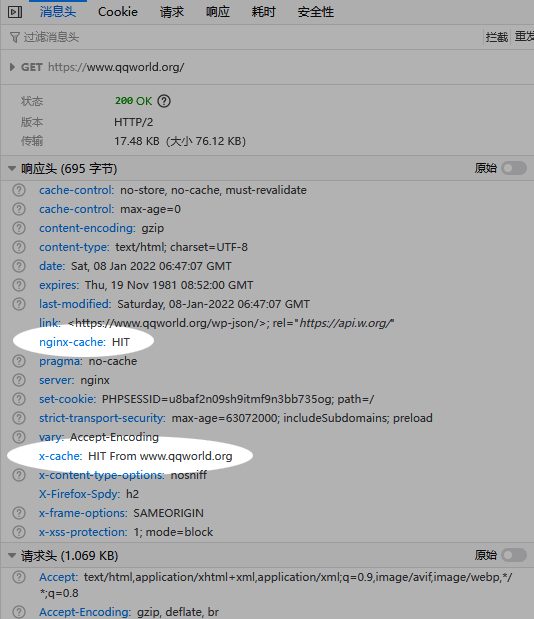
Press... F12 Open your browser's developer tools, visit the website's homepage while logged out, and check the HTTP headers. If you see... HIT indicates that the page is cached;BYPASS indicates that the page is not cached due to configuration settings;MISS This status appears when a page has not yet been cached—for example, a newly published page or one that has just been deleted—upon its first visit, as shown in the image:
Cache hit! Press F12 to open the developer tools, go to the "Network" tab, and refresh the page (F5). Click on the current page URL (e.g., yanxu.guilinkeji.com) in the list; in the panel that appears on the right, look under "Headers." If you see "HIT," it means the content is cached. If it doesn't appear immediately after configuration, try refreshing the page a few more times. As long as you follow the steps correctly, it should work perfectly.
That concludes this tutorial. You can explore further customization options on your own. Once you start using this caching method, even Baidu will favor your site more, leading to faster indexing and higher search authority!

Other Articles
A cool, swinging-animation 404 error page (HTML5)

No Comment! Be the first one.